Monday, 25 May 2020

Understanding focal length and aperture | Become a photographer with Shubham Part-9
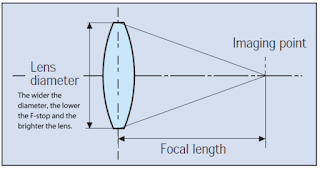
1. What if focal length
Focal length is the distance from the center of the lens to the imaging point

2. Focal length and aperture relation:
The aperture is a fraction that describes the ratio of aperture (entrance pupil) diameter to focal length.


3. How to differentiate between lenses:
Camera name itself says, like: Nikon 18-55mm f/3.5-5.6 AF-P. Maximum aperture is f/3.5 but it shifts gradually from f/3.5 at the wide end to just f/5.6 at the longer focal lengths. It can be identified by column as well, like:Nikon 50mm 1:1.4G(Max aperture f/1.4).


Nows lets get into the details:


1. What is focal length:
Focal length is the distance from the center of the lens to the imaging point (focal plane) where the light for the image is collected. When a lens is described as a "50mm lens," it is referring to its focal length. Different focal lengths create different levels of magnification and change the viewing angle of the resulting photograph. As the focal length value decreases, the lens becomes a wide-angle lens, and as the value increases it becomes a telephoto lens.


Changing the focal length changes the angle of view. The shorter the focal length (e.g. 18 mm), the wider the angle of view and the greater the area captured.


2. Focal length and aperture relation:

The aperture is a fraction that describes the ratio of aperture (entrance pupil) diameter to focal length. That’s all it is.

Aperture is literally “length over diameter.”

Notice the position of “f” traditionally shown when describing aperture.

An f/1.0 lens would have a diameter equal to the focal length.

At f/2.0, the aperture diameter is half of the focal length.

For f/8.0, the diameter is one eighth the focal length. Eight times as long as lens width. “f” over 8.0.

With the same aperture and a different lens length, the ratio stays the same.

A 50mm lens at f/4.0 is 12.5mm effective diameter.

A 200mm lens at the same aperture of f/4.0 would be 50mm diameter.


3. How to differentiate between lenses OR How to check the aperture of a lens by it's name and how to select the best lens for you:

Minimum and Maximum Aperture of Lenses

Every lens has a limit on how large or how small the aperture can get. If you take a look at the specifications of your lens, it should say what the maximum and minimum apertures are. For almost everyone, the maximum aperture will be more important, because it tells you how much light the lens can gather at its maximum (basically, how dark of an environment you can take photos).
A lens that has a maximum aperture of f/1.4 or f/1.8 is considered to be a “fast” lens, because it can pass through more light than, for example, a lens with a “slow” maximum aperture of f/4.0. That’s why lenses with large apertures usually cost more.

In contrast, the minimum aperture is not that important, because almost all modern lenses can provide at least f/16 at the minimum. You will rarely need anything smaller than that for day-to-day photography.

With some zoom lenses, the maximum aperture will change as you zoom in and out. For example, with the Nikon 18-55mm f/3.5-5.6 AF-P lens, the largest aperture shifts gradually from f/3.5 at the wide end to just f/5.6 at the longer focal lengths. More expensive zooms tend to maintain a constant maximum aperture throughout their zoom range, like the Nikon 24-70mm f/2.8. Prime lenses also tend to have larger maximum apertures than zoom lenses, which is one of their major benefits.

The maximum aperture of a lens is so important that it’s included in the name of the lens itself. Sometimes, it will be written with a colon rather than a slash, but it means the same thing (like the Nikon 50mm 1:1.4G below).


But larger aperture is always not good. They can cause "Diffraction".

Diffraction is actually quite simple. When you use a tiny aperture like f/32, you literally squeeze the light that passes through your lens. It ends up interfering with itself, growing blurrier, and resulting in photos that are noticeably less sharp.

When do you start to see diffraction? It depends upon a number of factors, including the size of your camera sensor and the size of your final print. Personally, on my Nikon full-frame camera, I see hints of diffraction at f/8, but it’s not enough to bother me. I actually use even smaller apertures like f/11 and f/16 all the time. However, I try to avoid f/22 or anything beyond it, since I lose too much detail at that point.


All srcs:

Important websites for a programmer

Sunday, 24 May 2020

Chrome extensions for pro coders and time saving

Six simple ways to improve communication skills | Learn English with Shubham - Part 2

To speak english fluently, you will have to start thinking in english. For that follow these 6 simple steps
  1. Start naming everything in english. Instead of "Chai", say it "Tea".
  2. Try to speak every days happenings in english.
  3. Try to speak new happenings in english.(What you did new today)
  4. Try to make paragraph from the sentences made in step 2 and 3.
  5. Check the grammar, review yourself.
  6. Speak, record, review repeat.

How to deliver a perfect talk | Learn English with Shubham - Part 1

  1. Reach the venue well before in time, say 15 mins. Talk to audience before talk,  get familiar with them. You can watch these familiar faces during the talk without facing difficulty. Spot 3 spots, right
    one, left one , and the middle one. Use these spots to watch during the talk.

  2. Rather than starting by saying "Good morning friends, I'm here to talk about ...bla bla bla, it's good to start by your subject "Cleanliness is next to godliness".

  3. Have some activities in between to get the audience involved.

  4. Find common things about you and the audience, use those to relate with your talk.

  5. WITFM: What is there for me.  Lets your audience be clear about what they are going to get.

  6. Do not act like a self-centric-speaker, rather behave like audience-centric-speaker. Do not talk much about you.

  7. Voice modulation is very very very effective in a talk.

  8. Mind you meal before the talk. Have some luke warm water and high fiber diet before the talk.  You can have water during the talk to keep your throat wet.

  9. Think and speak should be in sync.

  10. Try to talk to one person at a time. After you complete one point, try to point to another person.

  11. Go amongst the audience, be the audience.

  12. Body language. Don't touch your clothes, don't cross your fingers. Use eye and body to interact.

  13. Keep it simple silly.

Monday, 18 May 2020

Merge Sort | Learn Data Structure with Shubham part 2


function mergeSort(array, left, right) {

if (array && (left < right)) {
const mid = Math.floor((left + right) / 2);
/* THIS CAN BE BY FLOOR ONLY, consider the case [0,1,2,3] mid = Math.ceil(0+3)/2 would be 2, will break the array [0,1,2] and [3] an un-even break */
if (left != mid) { /* optinal check, otherwise recustion with return this condition from the first if condition */
mergeSort(array, left, mid);
}

if (mid + 1 != right) { /* again optional condition */
mergeSort(array, mid + 1, right);
}
mergeSubArray(array, left, mid, mid + 1, right);
}
return array;

}

function mergeSubArray(array, left1, right1, left2, right2) {
let resultant = [], c1 = left1, c2 = left2;
while (c1 <= right1 && c2 <= right2) {
if (array[c1] < array[c2]) {
resultant.push(array[c1]);
c1++;
} else if (array[c2] < array[c1]) {
resultant.push(array[c2]);
c2++;
} else {
resultant.push(array[c1]);
c1++; c2++;/* both are same */
}
}
if (c1 > right1) {
while (c2 <= right2) {
resultant.push(array[c2]);
c2++;
}
}
if (c2 >= right2) {
while (c1 <= right1) {
resultant.push(array[c1]);
c1++;
}
}
for (let i = 0; i < resultant.length; i++) {
array[left1 + i] = resultant[i];
}

}

var arr = [100, 20, 9, 10, 15, 1, 2, 3];

mergeSort(arr, 0, arr.length - 1);
console.log(arr)
/*TODO: Does the merge subarray really require extra array? or can it be optimized */

Sunday, 17 May 2020

Quick Sort Implementation in JS | Learn Data Structure with Shubham part 1

function quickPartition(array, start, end) {
if (!array || start == end) {
return null;
}
const pivot = array[end - 1];
let i = start - 1;
for (let j = start; j <= end-1; j++) {
if (array[j] < pivot) {
i++;
array[i] = array[j] + array[i] - (array[j] = array[i]);/* swap ith and jth element */
}
}
i++;
// swap ith and ni1th element
array[i] = array[end - 1] + array[i] - (array[end - 1] = array[i]);
return i;
}

function quickSort(array, start, end) {
if(start < end) {
const partionedElement = quickPartition(array, start, end);
        if (partionedElement == null) {
            return
        }
quickSort(start, partionedElement-1);
quickSort(partionedElement+1, end);
}
}


var array = [1, 2, 9, 10, 15];
quickSort(array, 0, array.length);


Doubts

  • When pivot is first node, then consider left as beg+1, and right as last index. Why do we start traversing right to left first, why not right to left.

    • ANSWER: Because leftmost node is pivot node. Left me element aaega jo chota hoga pivot se, and chota element hamesha right wala hi dega, left wala to bada element right me fekta h. Also the logic, pivot se bade utha kr pivot ke baad feko, chote utha kar pivot se pele feko. Left aaega to bada element uthega and pivot se replace krne pr bada element pivot se pele aa jaega.

    • Eg: 20 22 15 10, considering 20 as pivot node

      • Left se start kre to 22 > 20, so left se to chote hone chahie pivot se, so replace

      • 22 20 15 10: Ye to ulta ho gya. That’s why, start loop from the right to left first.

  • When pivot is left most, to pivot ki initial value kya hoti h?

  • Ek algo or tha, jisme for loop and j++ krte the.

  • Pivot node kese select kre? Left, middle or right?

    • ANS: Teeno ka median


Chosing pivot randomly:

To avoid this, you can pick random pivot element too. It won't make any difference in the algorithm, as all you need to do is, pick a random element from the array, swap it with element at the last index, make it the pivot and carry on with quick sort.


Complexities:

  • Worst Case: When the array is already sorted. O(n^2)

    • We can eliminate this case by choosing pivot node as median of first, last and the medium node, and replace that with the last node to keep using the same algorithm.

  • Best case: When the pivot node always come out to be the medium node in each case O(nLogn).

  • Avg case: (nLogn).To do average case analysis, we need to consider all possible permutation of array and calculate time taken by every permutation which doesn’t look easy.

    • We can get an idea of average case by considering the case when partition puts O(n/9) elements in one set and O(9n/10) elements in other set. Following is recurrence for this case.

    •  T(n) = T(n/9) + T(9n/10) + \theta(n)

    • Solution of above recurrence is also O(nLogn)

  • Space complexity: Space Complexity: O(n*log n)


AFTER HAVING THE WORST CASE COMPLEXITY OF O(n^2), WHY DO WE USE QUICK SORT???

Although the worst case time complexity of QuickSort is O(n2) which is more than many other sorting algorithms like Merge Sort and Heap Sort, QuickSort is faster in practice, because its inner loop can be efficiently implemented on most architectures, and in most real-world data. QuickSort can be implemented in different ways by changing the choice of pivot, so that the worst case rarely occurs for a given type of data. However, merge sort is generally considered better when data is huge and stored in external storage.


For arrays, merge sort loses due to the use of extra O(N) storage space.

Quick Sort is also a cache friendly sorting algorithm as it has good locality of reference when used for arrays.

Quick Sort is also tail recursive, therefore tail call optimizations is done.


Why MergeSort is preferred over QuickSort for Linked Lists?

In case of linked lists the case is different mainly due to difference in memory allocation of arrays and linked lists. Unlike arrays, linked list nodes may not be adjacent in memory. Unlike array, in linked list, we can insert items in the middle in O(1) extra space and O(1) time. Therefore merge operation of merge sort can be implemented without extra space for linked lists.

In arrays, we can do random access as elements are continuous in memory. Let us say we have an integer (4-byte) array A and let the address of A[0] be x then to access A[i], we can directly access the memory at (x + i*4). Unlike arrays, we can not do random access in linked list. Quick Sort requires a lot of this kind of access. In linked list to access i’th index, we have to travel each and every node from the head to i’th node as we don’t have continuous block of memory. Therefore, the overhead increases for quick sort. Merge sort accesses data sequentially and the need of random access is low.


What is 3-Way QuickSort?

In simple QuickSort algorithm, we select an element as pivot, partition the array around pivot and recur for subarrays on left and right of pivot.

Consider an array which has many redundant elements. For example, {1, 4, 2, 4, 2, 4, 1, 2, 4, 1, 2, 2, 2, 2, 4, 1, 4, 4, 4}. If 4 is picked as pivot in Simple QuickSort, we fix only one 4 and recursively process remaining occurrences. In 3 Way QuickSort, an array arr[l..r] is divided in 3 parts:

a) arr[l..i] elements less than pivot.

b) arr[i+1..j-1] elements equal to pivot.

c) arr[j..r] elements greater than pivot.

See this for implementation.


TODOS:

  • Pivot as middle


Src: https://www.geeksforgeeks.org/quick-sort/


Sunday, 10 May 2020

Sunrise Photography | Become a photographer with Shubham Part-9

What you want is a picture where the bright parts (i.e. the sun and sky) aren’t too bright, and the dark parts (i.e. the foreground) aren’t too dark. Basically you want an HDR image, but rather than shooting on a tripod and combining multiple exposures in post-production, you can do it with a single image by shooting in RAW.

There are a couple of ways to expose for the sun so it’s not too bright. You can set your camera to Center-Weighted metering, which ensures the middle of your picture is not too bright or too dark. Another method (and the one which I prefer), is to have your camera evaluate the entire scene but use exposure compensation to under-expose by roughly two stops.


Regardless of how you meter the scene and set your exposure, the end result is the same. In your resulting image, you want the sun to be visible and not too bright.

Small aperture helps: If you have a high-end zoom lens like a 70-200 f/2.8 or a 300mm f/4, you might be tempted to shoot sunrise pictures with the largest possible aperture. Blurry foregrounds and backgrounds are great, right? So why wouldn’t you shoot wide open?

Contrary to what you might think, smaller apertures are better when taking sunrise photos. First, it helps make sure your entire picture is sharp. Bokeh is great on portraits but not so desirable on most landscapes. A blurry foreground (thanks to a wide aperture) can distract the viewer and leave the scene feeling kind of mushy as a result.
Another reason to use smaller apertures, like f/8 or f/11, is that it gives you more control over your exposure. Remember, the sun is really bright, so you don’t need to worry about not getting enough light in your picture! On the contrary, you actually want to limit the amount of light, especially since you want the foreground to be underexposed


Use a fast shutter speed
The sun moves fast – really fast. Or, rather, the earth spins fast. That’s what is actually happening when you see the sun come up. And just like any time you want to capture motion, you need to use a shutter speed that’s up to the task. Slower values like 1/30th and 1/60th will not only make exposure tricky, but result in a blurry sun as it speeds upwards on the horizon. Use a minimum shutter speed of 1/250th, and even faster if possible

src: https://digital-photography-school.com/epic-sunrise-photos-with-a-zoom-lens/

Capture sunset perfect clicks and Silhouette Photography | Become a photographer with Shubham Part-8

Silhouette Photography is a type of photography where the main subject is dark and background is kept coloured.


  1. [Good to have] Focus the subject, then turn off the auto focus. It's required because making a dark object in-focus could be challenging for the camera. But make sure the camera should hold this position and do not move after turning off the auto focus.
  2. ISO: Minimun (100)
  3. Aperture: Enough to capture the sharp image. Roughly between f4 to f8.
  4. Metering: Spot metering. Pointed towards the background, say sky.
  5. Shutter speed: Adjust the shutter speed as the exposure scale should be showing zero. To capture only sun without any other object, do have a slow shutter speed to capture more and more colours in the sky. Use unexposed photos for sun only photos.
  6. If you want to capture only sunset, point the sun from any stone or any other object lying on the earth to get it more focused. Since the sun will be at bottom during sunrise/sunset.
  7. Zoom: 100-200mm would be a good range.
  8. Longer the lens, bigger the size of sun.


Capture milky way | Become a photographer with Shubham Part-7


  1. Having a tripod or any same gadget is a must to have a stable picture.
  2. Use this site to find a place to capture: https://darksitefinder.com/maps/world
    1. If you lie on a green zone, then only you will be able to click one. It's not really possible to capture from white or red spots.
  3. Moonless night will be the best one to capture such pics because there will be no light coming from any other source.